
Conduction, radiation, and convection are the three basic ways that heat is transferred through objects. The electromagnetic radiation that the objects emit will be used to carry the heat. An infrared camera can detect some of the infrared radiation that is released by the objects. It is thought to be a challenging technique to monitor the temperature of structures using infrared thermography. It is quite difficult to obtain calibrated temperatures without knowing all of the elements that affect the infrared radiation that the infrared camera measures.
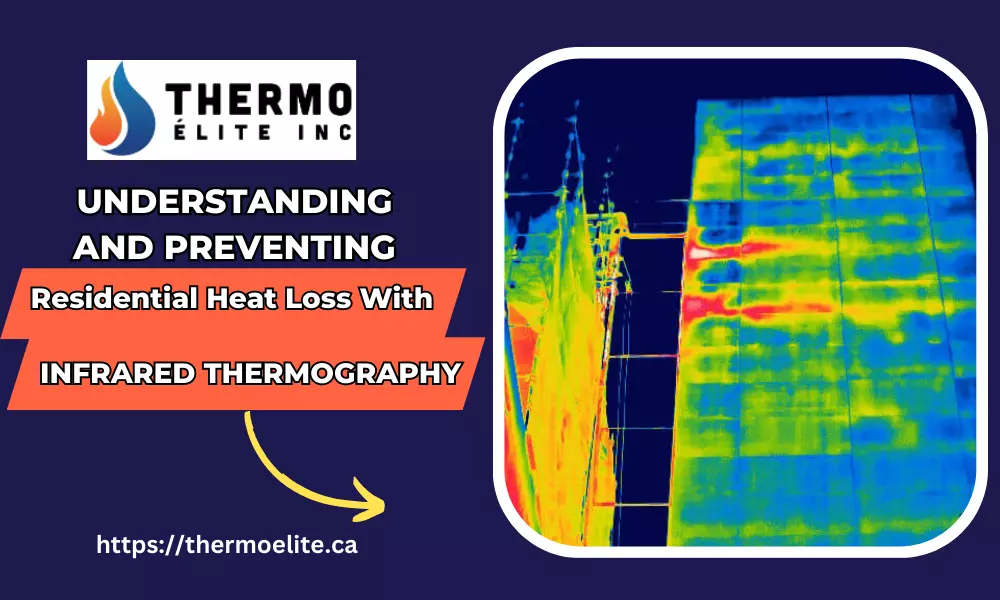
Thermography is particularly utilized in the building industry to assess the heat losses of structures. Through a color chart paired with a temperature scale produced by this method, it is possible to identify the energy loss (heat loss) of each building. Because the roof, walls, and windows are the three main areas where heat escapes from a building, aerial thermographic vision is extremely important.
How Does Infrared Thermography Work?
Thermal imaging, another name for infrared thermography, is a method for detecting and viewing infrared radiation that is released by objects using specialized cameras. Without making physical contact, it enables us to observe and gauge the temperature distribution over a surface or inside an item.
All objects above absolute zero (-273.15°C or -459.67°F) emit infrared radiation in the form of heat, according to the theory of infrared thermography. This radiation belongs to the electromagnetic spectrum’s infrared region, which is invisible to the human eye. But specialized cameras can pick up on this radiation and turn it into visible images that reflect temperature fluctuations.
Infrared or thermal cameras are the types of cameras used in infrared thermography. They are equipped with sensors that can identify and gauge the amount of infrared radiation that things emit. The temperature distribution over the scene is then represented by the cameras’ photos or recordings. Different hues or tones are used in these photos to depict various temperatures. Typically, warmer regions are depicted in red, orange, or yellow hues, whereas cooler regions are depicted in blue or purple tones. Quick visual comprehension of temperature fluctuations is made possible by this color mapping.
Nearly every industry recommends infrared thermography as a highly effective preventative maintenance technology. No other tool will provide you with such precise, real-time data without causing the process flow to be interrupted by shutting down your systems. Including infrared thermography in your routine maintenance cycle is an excellent approach to immediately spot irregularities in parts and machinery. Utilizing baseline thermography before purchasing new equipment or after repairing existing equipment will provide you with a collection of thermal images to compare all other tests against and make future problem-solving easier.
Understanding and avoiding home heat loss is made possible with the aid of infrared thermography. It entails taking pictures of temperature fluctuations in a house’s surfaces using an infrared camera. Homeowners can take action to increase insulation and energy efficiency by locating locations of heat leakage.
The following is a guide for understanding and preventing household heat loss using infrared thermography:
Thermography:
A building envelope’s interior or exterior surfaces can be examined using an infrared (IR) camera to determine how hot or cold each surface is. The term “thermography” or “thermal imaging” refers to this method. Surface temperature changes come from localized reductions in the thermal conductivity of the building envelope if a stable temperature difference between the inside and exterior of a building is established. An IR camera can be used to identify these fluctuations in surface temperature under favorable environmental circumstances.
Understanding Thermal Anomalies:
Thermal abnormalities will show up as color variations on the camera’s display during the infrared inspection. Warmer locations will seem orange, red, or yellow, while cooler places may appear blue or purple. Keep a close eye on temperature changes around windows, doors, electrical outlets, and other places where various building materials converge.
Examine the Findings:
Analyze the infrared photos to find areas of heat loss when the inspection is finished. Insufficient insulation or air leakage may be indicated by temperature discrepancies between interior and exterior walls. Pay attention to the places where heat loss is most noticeable and take note of how bad the problem is.
Describe Insulation:
Finding places with inadequate or insufficient insulation can be made easier with infrared thermography. Attic hatches, wall outlets, gaps around windows and doors, and inadequately insulated walls or roofs are typical places where heat might escape. Prioritise insulation upgrades using infrared pictures. Depending on the particular needs of each location, think about adding insulation in the form of spray foam, blown-in insulation, or batts/rolls.
Eliminate Air Leaks:
Heat loss is strongly impacted by air leaks. To find air leaks around windows, doors, and other openings, use infrared imaging. To fill in gaps and cracks, use weatherstripping, caulking, or sealant. To stop draughts coming in at the bottom of doors, think about putting door sweeps or draught stoppers. Sealing air leaks lowers heat loss and increases energy efficiency.
Accurate Heat Loss Detection:
Accurate and visible detection of heat loss in residential buildings is made possible by infrared thermography. Homeowners or experts can discover locations with temperature changes that suggest possible heat loss by taking thermal photos of various surfaces. This makes it easier to focus on problem areas.
Non-Destructive and Non-Intrusive:
Because infrared thermography is a non-intrusive and non-destructive technique, examinations can be carried out without endangering or disrupting the structure of the building. It is practical and economical since it may be used to measure heat loss without the need for invasive treatments.
Comprehensive Evaluation:
A thorough evaluation of heat loss in a residential building is provided using infrared thermography. It makes it possible to find thermal anomalies in surfaces like walls, windows, doors, roofs, and other places where heat loss is frequent. This makes it possible to comprehend the magnitude and origins of heat loss in great detail.
Upgrades to Windows:
Frequently, heat is lost through windows. It might be time to upgrade to more energy-efficient windows if you see noticeable temperature fluctuations near windows in the infrared photos. Multiple-pane windows, low-emissivity (low-E) coatings, and insulated frames are things to look for. By reducing heat loss and enhancing comfort, these characteristics can be helpful.
Track Development:
To assess the success of your efforts, perform a follow-up infrared check after upgrading the insulation, caulking air leaks, and taking other steps. To determine whether there has been a decrease in heat loss and temperature changes, contrast the new infrared photos with the older ones.
Examining An HVAC System:
Your HVAC system’s effectiveness can be evaluated with the aid of infrared thermography. In the ductwork, look for temperature changes that could be signs of insulation or air leakage. To increase the effectiveness of your HVAC system and minimize heat loss, take into account scheduling maintenance or repairs.
Maintaining And Observing Routinely:
The efficiency of the adopted solutions can be frequently checked, and any new locations of heat loss can be found using infrared thermography. Verify that other changes, such as improved air sealing and insulation, are working as planned by conducting follow-up inspections. Maintain the thermal envelope of your home by performing routine maintenance.
The infrared camera is one of the few tools that can deliver as much data in a little period of time. Through the display of infrared light that is invisible to the human eye, the IR camera provides a look at how heat energy is circulating through a system. The process of detecting infrared radiation (heat energy) emitted from an object, translating it into a temperature, and displaying that data as a picture is known as infrared thermography. A loose electrical connection or air or water leak in a structure can be found using this technique. The IR camera is one of the most crucial tools commissioning agents have accessible for inspecting everything from photovoltaic arrays to roofing systems.
To power numerous systems required for regular operation in every building, electricity is used. Electrical system overheating may be a sign of a problem that will deteriorate further until it breaks. Early detection of these problems keeps everything running smoothly and safely while preventing failures. Electrical systems are a fantastic choice for IR scanning because of these factors. Residential heat loss can be prevented by using infrared thermography as a preventative maintenance tool. This allows homeowners to pinpoint problem areas, make targeted upgrades, and increase their houses’ energy efficiency. As a result, the cost of heating is decreased, comfort is increased, and a more sustainable living environment is produced.
Add Comment